Adding a new Service to your practitioner profile.
In this guide, we will walk you through the process of adding a Service to your profile page. Service can be anything from a yoga class to a meditation workshop or an individual consultation.
1. Click "Add Service" button from your Profile Page in Edit mode. You can choose from: 1:1 Session, Group Class, Workshop, and Empowered plan services such as Retreat and Transmission.
2. Follow the steps:- Step 1: Enter service details

-
- Service Name (140 character limit)
-
-
-
- Location & Platform:
- Virtual: Heallist (built-in), Zoom, Phone number, Other (external call link)
- In-Person
- Location & Platform:
-
-
-
- Fee Type: Fixed Fee, Sliding Scale, By Donation, or Free
- Price Amount
- Currency: USD, EUR, GBP, or CAD
-
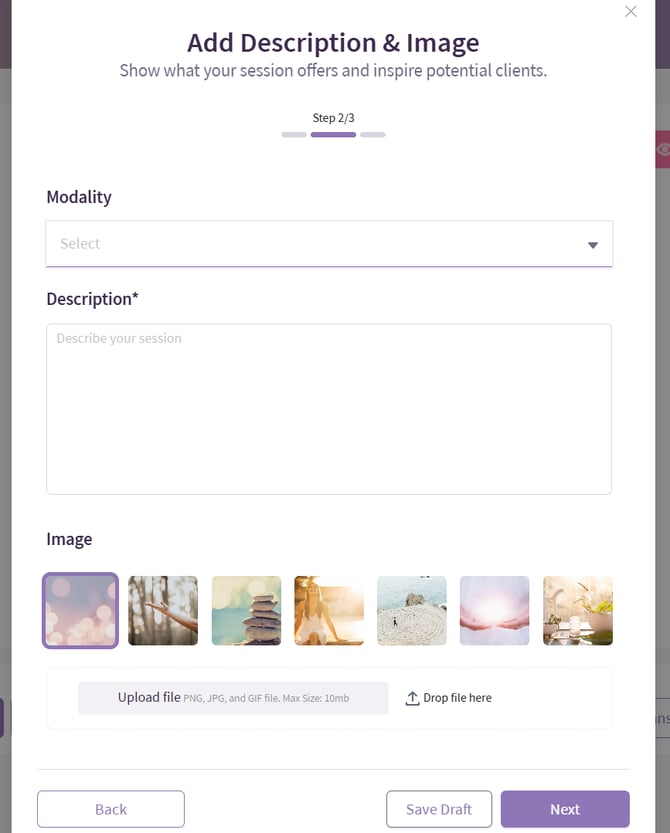
- Step 2: Add Description & Image

-
- Modality (chosen from the selection provided in your profile)
-
-
-
- Description (Max 5,000 characters)
- Service Picture - Select from our gallery or upload your own (Max file 10Mb)
-
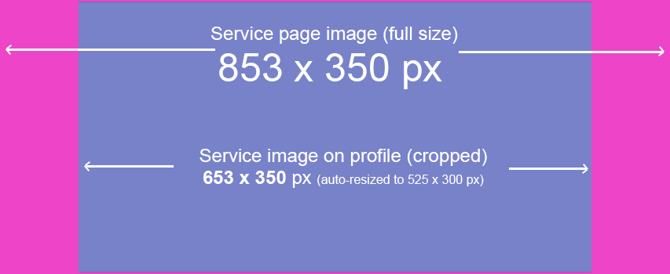
To keep your service listings looking polished and consistent across Heallist, here are the recommended image dimensions you can follow when uploading your service photos:
-
Recommended image size: 853 x 350 px
This size ensures your photo displays clearly on both your Profile page (cropped center) and the individual service booking page (full-size photo). -
Safe zone for important elements: 525 x 300 px
Make sure any important text, logos, or image focal points are positioned within the central 525 x 300 px area.
This is the portion that appears as a preview on your Profile page service listings. -
File type: JPG , GIF, or PNG
Tip: If you’re using a design tool like Canva, set your canvas size to 853 x 350 px and center your key elements within the middle 525 x 300 px space for best results.

-
-
-
- Step 3: Set Your Availability
- Duration
- Timezone
- Select hours of availability
- Add buffer time between services
- Add minimum notice before appointments for the applicable service type.
Note: Make sure you select the right service type in Step 1 to see the right scheduling options populated in Step 3.
1:1 Session
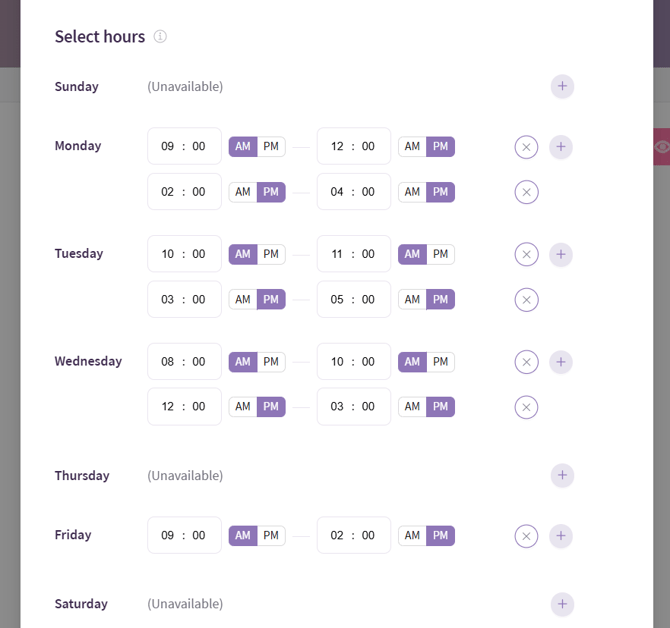
- Set your general availability window during which the clients can book your services. Select days of the week, Time zone, then Hours for each day. You can customize the hours by day, as well as add multiple availability slots for each day, for example 9-11am, 1-3pm, 6-8pm. To do so, simply keep changing the hours and clicking Add next to the day of the week.
- Group Class - Set the day/time for the class and the number of recurrences. For examples, Monday and Thursdays at 6-7pm, for a total of 10 recurrences will create the sessions for the next 5 weeks. When you set the recurrences number, the dates will automatically populate on the screen. You can remove a specific day from the list (for example a Holiday) and a new date will be added at the end. Play with the number of recurrences to get the right schedule for a service.
- Workshop - Set a date and time. Workshops are non-recurring and usually a one-off events.
How to Add Working Hours for Services in Heallist
If you offer services at different times throughout the day, Heallist allows you to set multiple time slots within your working hours to provide more flexibility for clients. Follow these steps to customize your availability:
Steps to Add Multiple Time Slots:

-
-
-
Under the Step 3: Set Your Availability section, define your standard working hours.
-
You can set different availability for each day of the week.
- For example, if you are available in the morning and evening, you can set multiple slots depending on your available hours.
-
-
- Once you've added all your time slots, click Save to apply the changes.
Your clients will now see multiple available booking options within your working hours, making it easier for them to schedule appointments at convenient times.
Buffer Time Between Bookings
Heallist now offers the ability to add buffer time between bookings of your 1:1 sessions! This feature ensures you have enough time to prepare for your next appointment or to rest and recharge.
How It Works:
- Choose from predefined buffer options: 15, 30, 45, or 60 minutes.
- Buffer time is automatically applied after each booking, reserving that interval on your calendar.
- It ensures a smooth workflow by preventing back-to-back appointments.
Where to Set It Up:
You can enable and adjust buffer time when adding or editing services on your profile page:-
- Navigate to your profile page and click the "+ Add Service" button to create a new service.
- Once you select the 1:1 service type, fill in the required details until you reach the Service Availability tab.
- Under Select Hours, tick the checkbox to enable buffer time between appointments and choose your desired interval.

-
New Feature! How to Set Minimum Notice Before Appointments
To help you manage your time, energy, and preparation for each session, Heallist allows you to set a minimum notice period for client bookings. This means clients won’t be able to book an appointment too close to the session time, giving you a buffer to prepare or adjust your schedule.
You can choose from the following notice periods:
-
-
1 hour
-
8 hours
-
12 hours
-
24 hours
-
To set a minimum notice period for client bookings, please refer to this article: How do I set minimum notice before appointments?
This ensures clients can only book sessions with enough lead time for you to prepare.
Click Save Draft to save a draft of the service. Drafts can be accessed via the Drafts tab in the Services block of your Profile page.
Click Publish to make your service Live and available for Bookings. Please note, if you are a new user, you will need to connect (or create) a Stripe account in order to receive bookings. Please see our Connecting Stripe guide for more info.
To make changes to a Service at any time, click the Edit button on the top right corner, then Save Changes. Any changes to pricing, duration and timing will only be in effect for future bookings. If you need to create a similar service with different times/ dates, we highly recommend creating a new service with the new details.
To Delete a service from the profile, click on the right top corner menu of that particular service and then "Delete".
To Duplicate a service and change details to save as new, click the Duplicate link from the top right menu. In the newly opened window make any changes and click Publish as new.
